近期问我基于RouterOS 如果通过隧道上网的人比较多,但我这方面的确很空白,和周围的朋友了解了下,准备从尝试VPS搭建开始。
我的思路是在VPS上安装RouterOS CHR,然后建立隧道。网上找了制作的命令脚本,测试也成功了,但之前写的内容有问题,在这里重新更新(2021年8月9日)
关于网上的一些配置,其实找到的都是获取Linux的IP地址和网关,通过RouterOS脚本写入到镜像,安装完成后能直接连接,但我觉得这部分没有必要,因为VPS都使用了DHCP服务分配IP地址,CHR的RouterOS系统,安装完成后会自动创建DHCP-client自动获取IP,所以这部分是多余的。
关于mount挂载镜像这部分我还是多说下,因为我自己想做一个笔记,记录下关于mount的offset,查看img镜像文件的扇区,fdisk -l chr.img,可得到IMG的数据信息,其中有开始的镜像扇区数N与每个扇区的长度,如下(offset这部分可以忽略,不关心的大家直接跳到VPS安装):
6.36.4.img镜像是两个分区,我们从
root@raspberrypi:~# fdisk -l chr-6.36.4.img
Disk chr-6.36.4.img: 128 MiB, 134217728 bytes, 262144 sectors
Units: sectors of 1 * 512 = 512 bytes
Sector size (logical/physical): 512 bytes / 512 bytes
I/O size (minimum/optimal): 512 bytes / 512 bytes
Disklabel type: dos
Disk identifier: 0x00000000
Device Boot Start End Sectors Size Id Type
chr-6.36.4.img1 * 1 65536 65536 32M 83 Linux
chr-6.36.4.img2 65537 262143 196607 96M 83 Linux
65337*512=33554944
6.47.8.img的分区:
root@raspberrypi:~# fdisk -l chr-6.47.8.img
Disk chr-6.47.8.img: 64 MiB, 67108864 bytes, 131072 sectors
Units: sectors of 1 * 512 = 512 bytes
Sector size (logical/physical): 512 bytes / 512 bytes
I/O size (minimum/optimal): 512 bytes / 512 bytes
Disklabel type: dos
Disk identifier: 0x00000000
Device Boot Start End Sectors Size Id Type
chr-6.47.8.img1 * 1 131071 131071 64M 83 Linux
直接使用N=1,Sector=512B,相乘即可得到offset = 1*512 = 512 (Byte)
申请相应的VPS(根据自己需求选择VPS节点,推荐一个HK的主机),硬件配置单核CPU,1G内存、20G以上存储空间足够,安装操作系统选择CentOS7.x、ubuntu或Debian的linux系统都ok
VPS申请完成后,通过SSH或者控制台检查网络是否正常,确保DNS已经配置正确
[root@myvps ~]# cat /etc/resolv.conf
; generated by /usr/sbin/dhclient-script
nameserver 108.61.10.10
[root@myvps ~]#
可以通过ping命令测试DNS解析是否正常
[root@myvps ~]# ping www.google.com
PING www.google.com (74.125.137.106) 56(84) bytes of data.
64 bytes from 74.125.137.106 (74.125.137.106): icmp_seq=1 ttl=110 time=6.40 ms
64 bytes from 74.125.137.106 (74.125.137.106): icmp_seq=2 ttl=110 time=6.41 ms
64 bytes from 74.125.137.106 (74.125.137.106): icmp_seq=3 ttl=110 time=6.45 ms
64 bytes from 74.125.137.106 (74.125.137.106): icmp_seq=4 ttl=110 time=6.54 ms
^C
— www.google.com ping statistics —
4 packets transmitted, 4 received, 0% packet loss, time 3004ms
rtt min/avg/max/mdev = 6.405/6.454/6.546/0.079 ms
[root@myvps ~]#
DNS解析正常,才能从mikrotik下载CHR安装文件
通过ip addr命令查看网卡名称
[root@myvps ~]# ip addr
1: lo: <LOOPBACK,UP,LOWER_UP> mtu 65536 qdisc noqueue state UNKNOWN group default qlen 1000
link/loopback 00:00:00:00:00:00 brd 00:00:00:00:00:00
inet 127.0.0.1/8 scope host
lo valid_lft forever preferred_lft forever inet6 ::1/128 scope
host valid_lft forever preferred_lft forever
2: eth0: <BROADCAST,MULTICAST,UP,LOWER_UP> mtu 1500 qdisc mq state UP group default qlen 1000
link/ether 56:00:03:11:1d:22 brd ff:ff:ff:ff:ff:ff inet xx.42.101.160/23 brd xx.42.101.255 scope global dynamic eth0
valid_lft 86019sec
preferred_lft 86019sec inet6 2001:19f0:6001:3f4a:5400:3ff:xxxx:1d22/64
scope global mngtmpaddr dynamic valid_lft 2591888sec preferred_lft
604688sec inet6 fe80::5400:3ff:xxxx:1d22/64 scope link valid_lft forever
preferred_lft forever
[root@myvps ~]#
命令查看到,公网IP地址的网卡名称为eth0
查看硬盘名称,通过命令fdisk -l
[root@myvps ~]# fdisk -l
Disk /dev/vda: 26.8 GB, 26843545600 bytes, 52428800 sectors
Units = sectors of 1 * 512 = 512 bytes
Sector size (logical/physical): 512 bytes / 512 bytes
I/O size (minimum/optimal): 512 bytes / 512 bytes
Disk label type: dos
Disk identifier: 0x0009a079
Device Boot Start End Blocks Id System
/dev/vda1 * 2048 52428766 26213359+ 83 Linux
[root@myvps ~]#
确认磁盘名称为/dev/vda
使用wget命令,下载CHR镜像文件(Raw disk image),下载RouterOS v7.0的操作相同
wget https://download.mikrotik.com/routeros/6.47.10/chr-6.47.10.img.zip -O chr.img.zip
解压文件:
unzip -c chr.img.zip > chr.img
如果没有安装unzip,ubuntu和debian可以使用apt-get安装:
apt-get update
apt-get install unzip
国外的VPS都做了dhcp服务器,IP地址绑定了VPS。CHR会创建dhcp-client配置,自动获取公网IP地址,最后使用dd命令将镜像写入vda:
[root@localhost ~]# dd if=chr.img bs=1024 of=/dev/vda
[root@localhost ~]# reboot
6.47.10的整个安装过程如下(解压后的文件名是chr-6.47.10.img):
[root@localhost ~]# dd if=chr.img bs=1024 of=/dev/vda
65536+0 records in
65536+0 records out
67108864 bytes (67 MB) copied, 3.59435 s, 18.7 MB/s
[root@localhost ~]# reboot
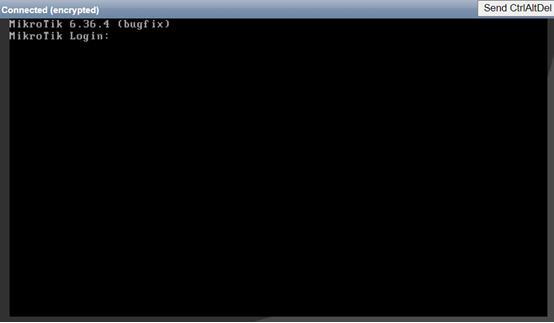
执行到reboot后,如果VPS不自己重启,在控制台手动重启VPS,下面是启动完成后的的登录界面,账号为admin,密码为空
进入控制界面后,通过/ip add print检查ip地址
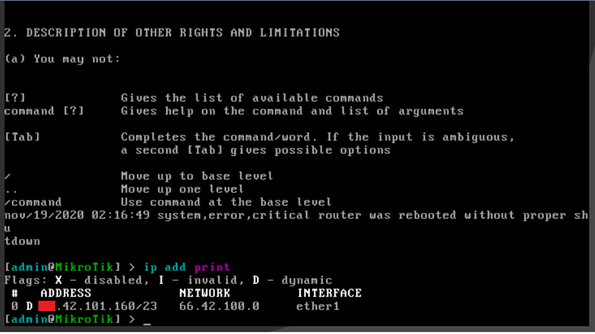
检查网络没问题后,输入password命令修改admin密码,黑客对VPS扫描很厉害。
我安装完后没有及时修改密码就被黑了,黑的方式是,添加RouterOS计划任务,定时通过fetch下载脚本,import导入脚本,脚本会开启ip socket服务,允许指定IP连接到RouterOS的socket接口,然后关闭掉ip service下的所有服务端口,使得远程无法管理RouterOS,还好没有修改admin密码。
进入/system package upgrade下,使用check-for-updates命令,检查最新版本

使用download命令,下载更新RouterOS版本

然后使用/system reboot命令重启

重启完成后,使用winbox登录最新版本的RouterOS系统,完成配置,建议在/ip service菜单下关闭或修改不需要的服务端口。
进入winbox配置完成后,可以申请CHR的许可,但需要先注册MikroTik账号,进入system license查看ID
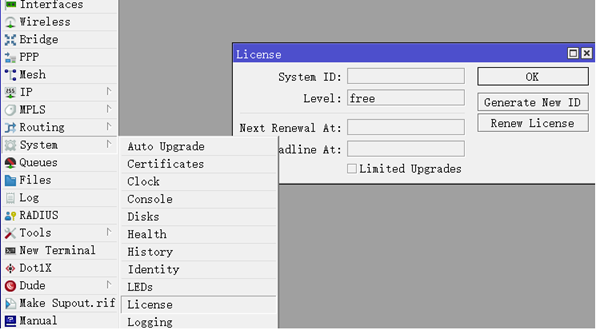
点击renew license,输入MikroTik注册的账号密码,申请P1许可,可以免费使用60天
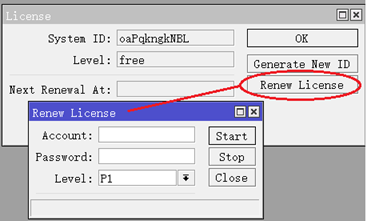
60天内都可以购买正式版,P1等级就够用了,价格45USD,关于CHR的许可注册购买流程可以参见CHR(Cloud Host Router)许可注册购买流程
2023-12-13T11:46:19
2023-12-13T11:48:22
2024-01-02T09:07:42

2024-01-02T09:07:20
2024-01-02T09:06:50

2024-01-02T09:06:26

2024-01-02T09:06:01

2024-01-02T09:05:20

2024-01-02T09:04:49

2024-01-02T09:04:17